
 フェニック
フェニックWordfence Securityを入れてみたけど英語ばっかりで読みにくい。設定方法が知りたいな。
今回はこのようなお悩みにお答えします。
Wordfence Securityは、WordPressが推奨するセキュリティプラグインです。
ただし設定項目が多く、英語表記のため設定方法や使い方がわかりづらいです。
そこで今回はWordfence Securityの設定方法と使い方を日本語訳付きで解説します。
また画像50枚以上使い解説しているので、真似するだけでOKです。
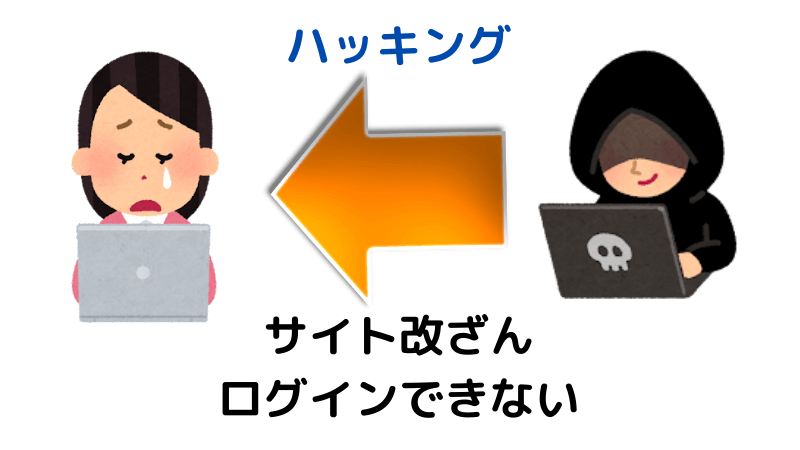
- ハッキングの防止
- スパムコメントのブロック
- サイト内のコンピューターウイルスの撲滅
この記事を読んで、大事なブログを徹底的に守りましょう。
追記です。
WordPressを立ち上げたばかりの人にはWordPressの初期設定の記事もおすすめです。
この記事の著者

Shota
副業ブロガー歴3年。月間32,000PVのブログフェニックスを運営。

Wordfence Securityのインストール方法
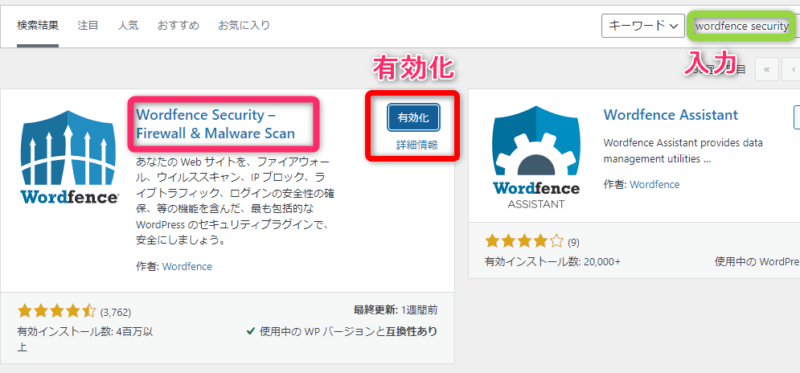
ダッシュボードからプラグイン検索画面に進みます。
検索窓に「Wordfence Security」と入力すると、上図のように盾の画像が描かれたプラグインが表示されます。
インストールボタンをクリックすれば完了です。
さっそく有効化しましょう。
Wordfence Securityの無料ライセンスを取得する
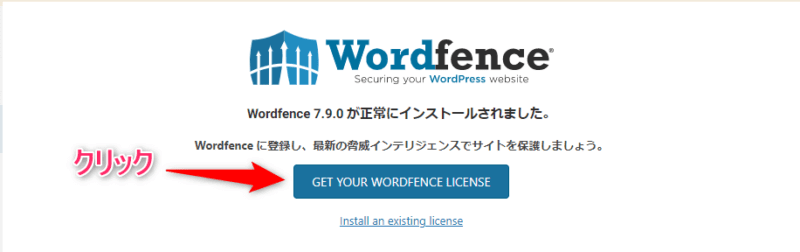
有効化したら、Wordfence Securityの無料ライセンスを取得します。
【GET YOUR WORDFENCE LISENSE】をクリックします。
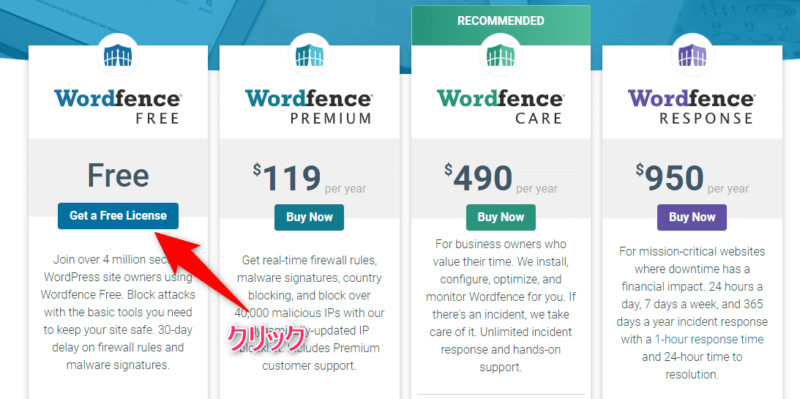
【Get a Free Lisense】をクリックしましょう。

「Are you sure you want delayed protection?」と聞かれますが【I’m OK waiting 30 days for protection from new threats.】をクリックします。
 Shota
Shota青ボタンをクリックすると有料ライセンスの購入画面へ移動してしまいます。
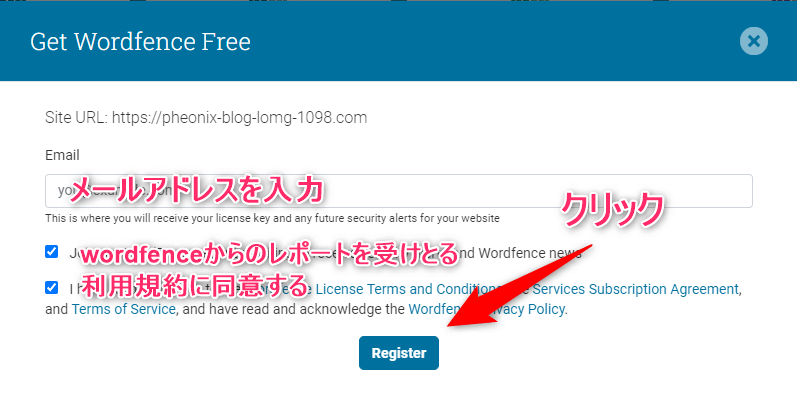
「Get Wordfence Free」の項目では、以下のように設定します。
| 項目 | 設定方法 |
|---|---|
| 無料ライセンスを受け取るメールアドレスを入力 | |
| Wordfenceからのレポートを受け取る | チェックを入れる |
| 利用規約に同意する | チェックを入れる |
設定が完了したら【Register】をクリックしましょう。
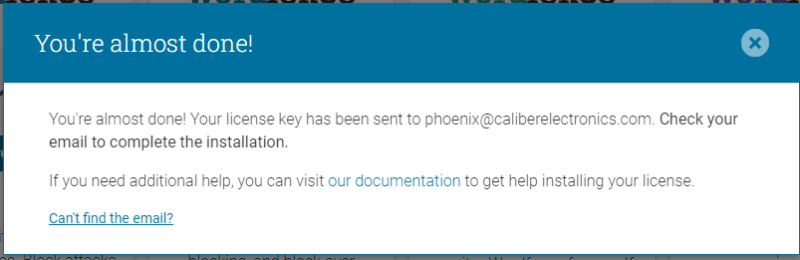
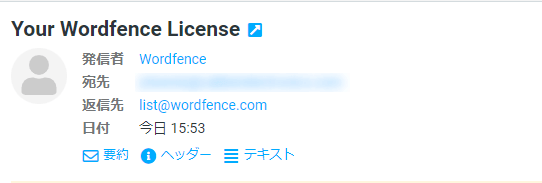
「You’re almost done!」と表示されたら、登録したメールアドレスを確認します。
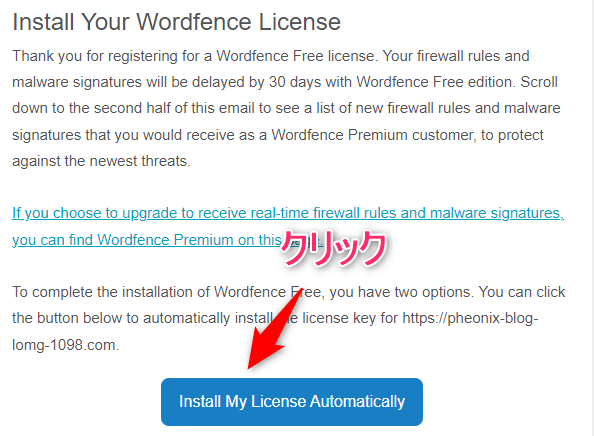
【Install My License Automatically】をクリックしましょう。
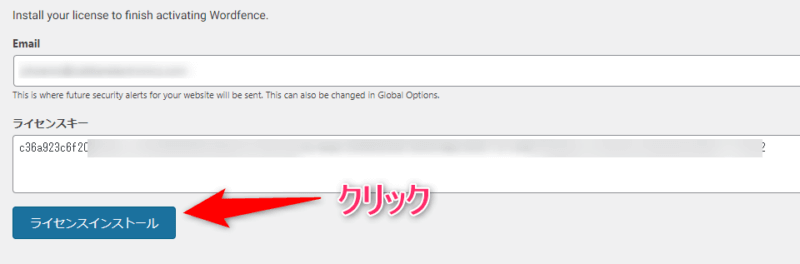
WordPressの管理画面へ移動します。
【ライセンスインストール】をクリックしましょう。
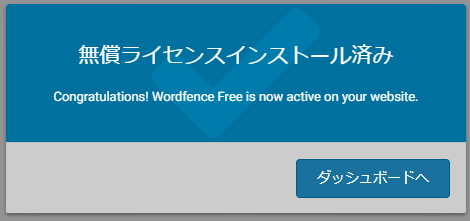
【無償ライセンスインストール済み】と表示されたら、無料ライセンスの取得は完了です。
Wordfenceのインストールが不完全と表示された場合
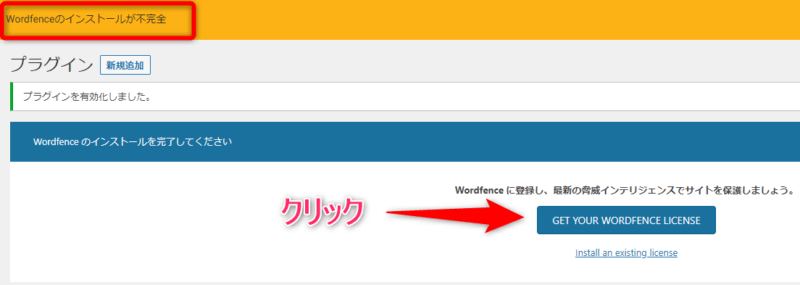
無料ライセンスを取得しましょう。
まずは【GET YOUR WORDFENCE LISENSE】をクリックします。
あとはWordfence Securityの無料ライセンスを取得するに従い、設定を進めてください。
Wordfence Securityの設定方法
Wordfence Securityを使いこなす前に、初期設定を済ませましょう。
Wordfence Securityの設定は以下の3点です。
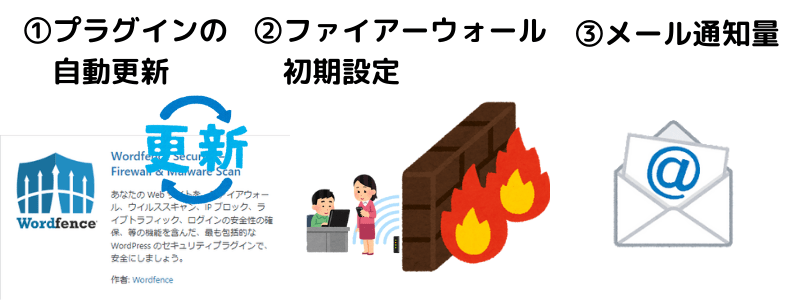
- Wordfence Securityの自動更新設定
- ファイアウォールの初期設定
- Wordfence Securityのメール通知設定
Wordfence Securityの自動更新設定
 フェニック
フェニックプラグインの更新ボタンを毎回押すのは面倒なのでありがたいね!
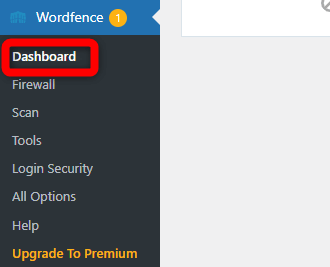
ダッシュボードから【Wordfence】⇒【Dashbord】に進みます。
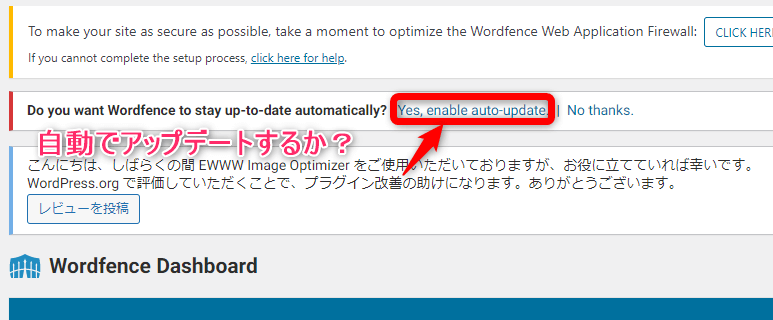
上図のように【Yes,enable auto-update】をクリックすれば自動更新設定は完了です。
Wordfenceファイアウォールの初期設定
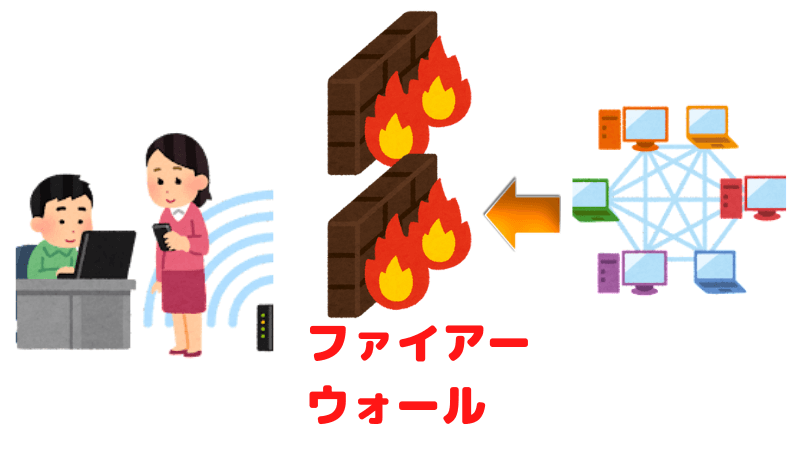
フェニックいきなりだけどファイアウォールって何のこと?
Shotaハッキングなどの攻撃からWordPressを守ってくれる無料サービスだよ。
WordPressは世界中で使われる人気のCMSですが、セキュリティの弱さが最大の弱点です。
ファイアウォールには、外部ネットワークからの攻撃やハッカーによる不正なアクセスから、自分たちのネットワークやコンピュータを防御する機能があります。
 フェニック
フェニックファイアーウォールはまさに防火壁だね。
WordfenceファイアウォールをLearning Modeにする
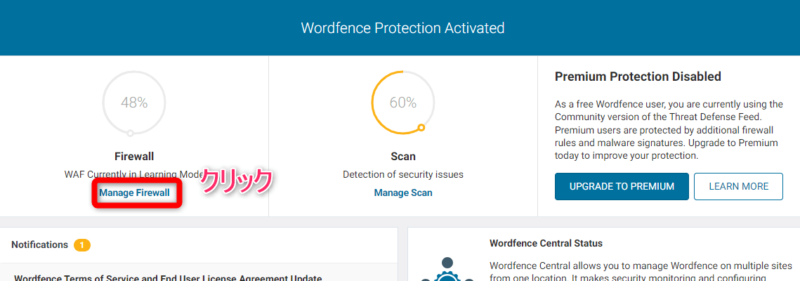
ダッシュボードから【Wordfence】⇒【Dashbord】に進みます。
上図のように【Manage Firewall】をクリックすると、ファイアウォール管理画面に進みます。
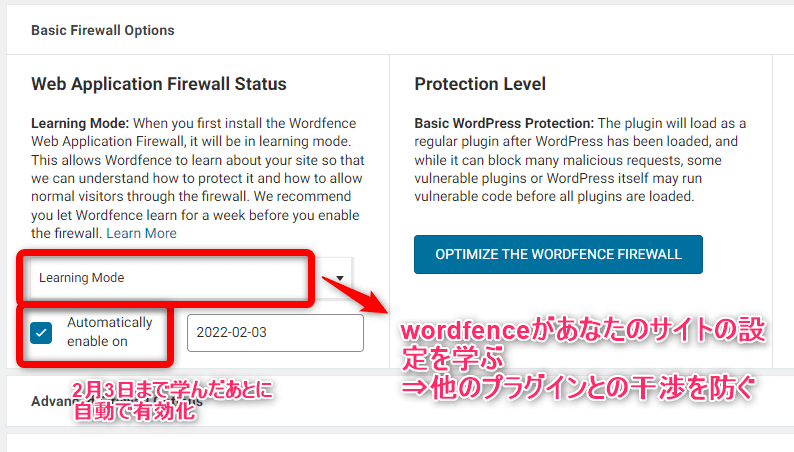
【Web Application Firewall Status】の項目が以下の設定になっていることを確認しましょう。
- Learning Modeが選択されている
- Automatically enable on(自動的に有効化)にチェックが入っている
- 日付がプラグインを有効化してから1週間後になっている
フェニックLearning Modeってどういう意味?
Shotaファイアウォールが1週間、サイトの構造やどういう相手と通信しているかを学習するんだ。
ファイアウォールは1週間サイトを学習することで「安全にサイトを保護する方法や、読者さんと悪質なクローラーを見分ける方法」を理解します。
ファイアウォールが学習する前にサイト情報をダウンロードする
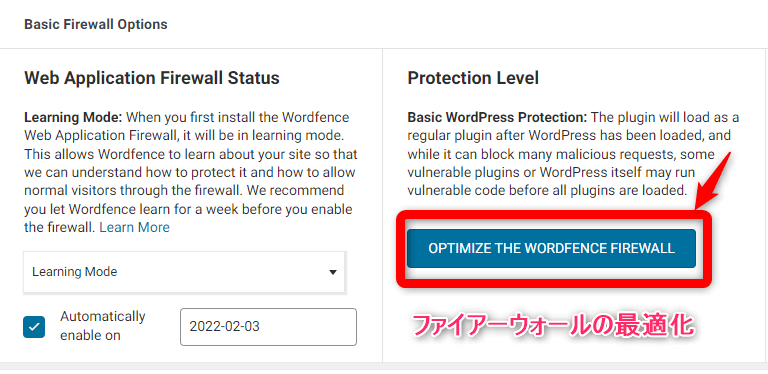
万が一ファイアウォールが誤って学習した場合、読者さんとの通信を勝手に遮断してしまう可能性があるからです。
バックアップデータを取得しておけば、万が一の時でも復旧は可能です。
【OPTIMIZE THE WORDFENCE FIREWALL】をクリックします。
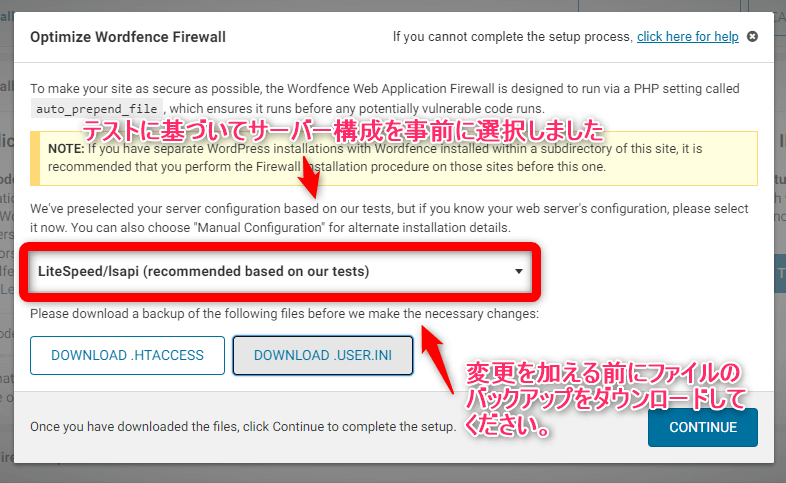
クリックするとOptimize Wordfence Firewall(ファイアウォールの最適化)という画面が表示されます。
ファイアウォールが事前に学習するサーバーを指定してくれています。
 Shota
Shotaファイアウォールは正しく私のサーバーを指定してくれました。
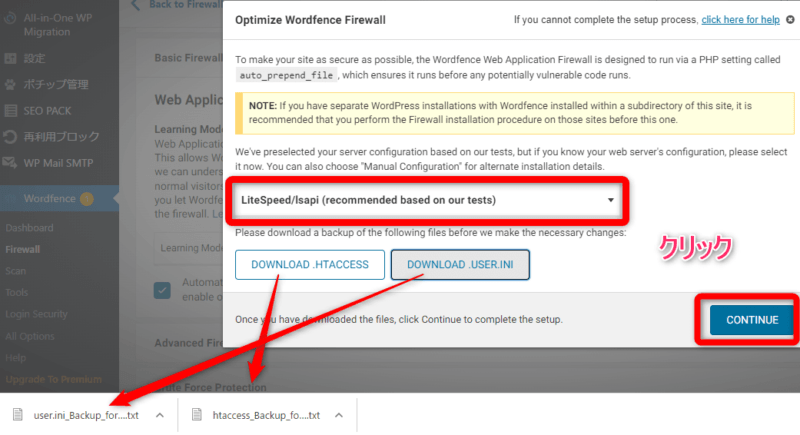
【DOWNLOAD .HTACCESS】と【DOWNLOAD .USER.IN】をクリックすれば、サーバー情報をダウンロードできます。
フェニックダウンロードしたファイルは大切に保管しておいてね。
ダウンロードが完了したら【CONTINUE】をクリックしてください。

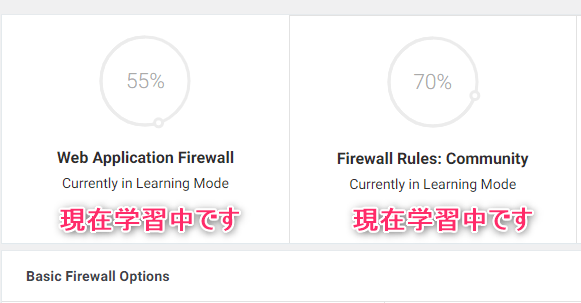
Learning Modeの進捗は【Basic Firewall Options】の円グラフで確認できます。
フェニックOptimize Wordfence Firewallでダウンロードしたサイト情報はどうすればいいの?
ShotaLearning Mode後にWordfence Securityが異常を起こした際、レンタルサーバー内のファイルをダウンロードしたデータに書き換えればOKです。
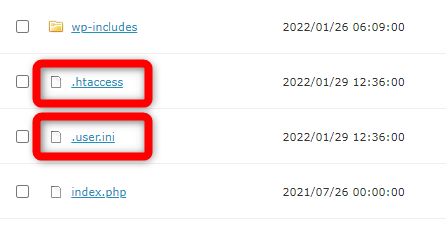
書き換えるファイルは「.htaccess」と「.user.ini」です。
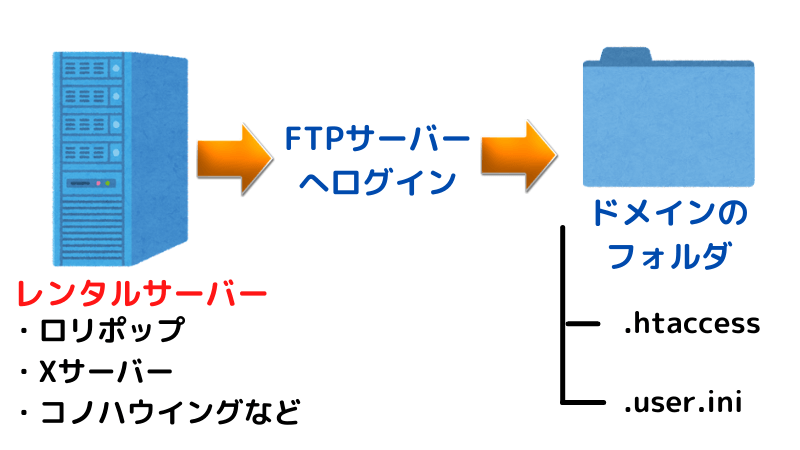
ドメイン直下にあるので確認してみましょう。
Wordfence Securityのメール通知設定
ブログのPV数が増えるとハッカーによる攻撃が増えるため、Wordfence Securityから送られてくる警告メールが増えてしまいます。
【Wordfence】⇒【All Options】⇒【Email Alert Preferences】へとページを進めます。
以下を参考に【Email Alert Preferences】の項目にチェックを入れてください。
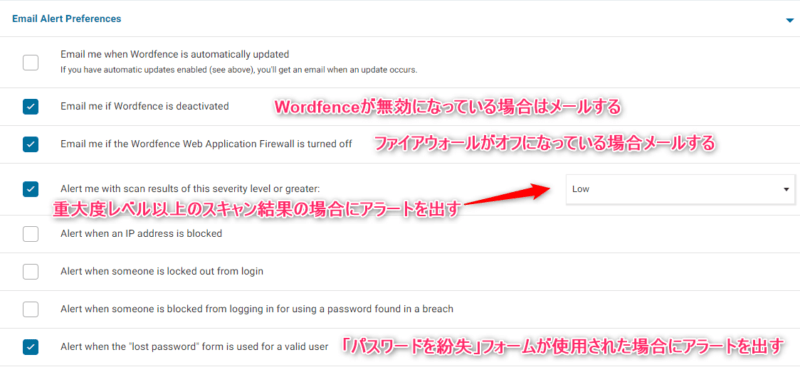
- Email me if Wordfence is deactivated(Wordfenceが無効になっている場合はメールする)
- Email me if the Wordfence Web Application Firewall is turned off(ファイアウォールがOFFになっている場合はメールする)
- Alert me with scan results of this severity level or greater(重大レベル以上のスキャン結果が出た場合にメールする)
- Alert when the “lost password” form is used for a valid user(パスワード紛失フォームが使用されたらメールする)
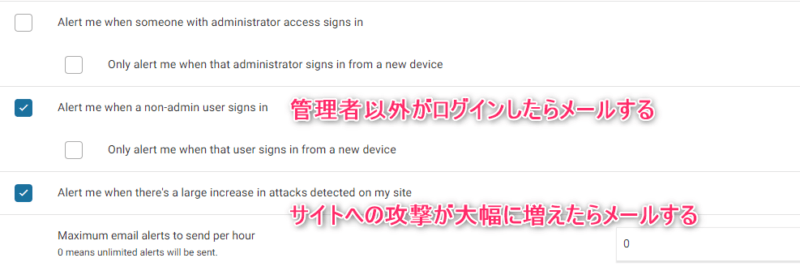
- Alert me when a non-admin user signs in(管理者以外がログインしたらメールする)
- Alert me when there’s a large increase in attacks detected on my site(サイトへの攻撃が大幅に増えたらメールする)
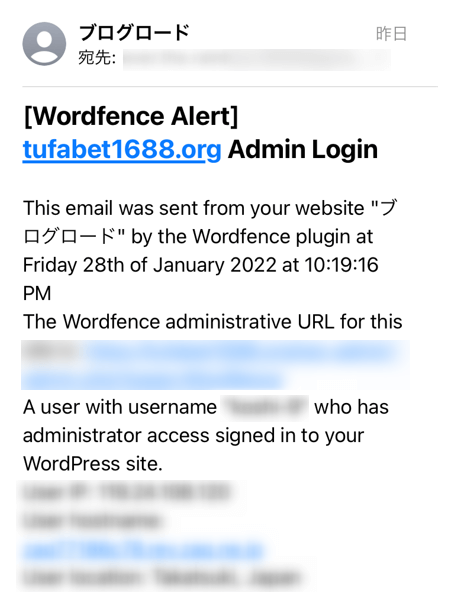
問題があった場合は上図のようなメールが送られてきます。
Wordfence Securityからメールがあった場合は、内容をチェックするようにしましょう。
まだWordPressにメールボックスを設置できていない方はContact Form by WPFormsの使い方とreCAPTCHAの設定をご覧ください。
メールボックスの作り方をわかりやすく解説しています。
Wordfence Securityの使い方
Wordfence Securityには、以下の3つセキュリティ機能があります。
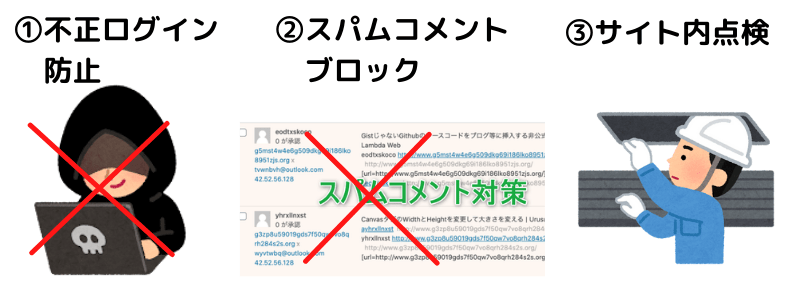
- WordPressログイン画面からの不正ログインを防止
- コメント欄に貼り付けられるスパムコメントをブロック
- スキャン機能でサイト内を点検
Shotaまずはログイン画面からの不正ログイン防止機能を解説します。
ハッカーがWordPressに不正ログインすると、以下のような被害を受けることになります。
- サイトが見られなくなる
- サイト内容が改ざんされてしまう
- マルウェアやフィッシングサイトへ飛ばす、サテライトサイトにされてしまう
- 読者さんの個人情報が漏洩する
ブルーフォースアタックへの対策を実施
ログイン画面にreCAPTCHAを設置
ログイン画面に2段階認証機能を設置
2段階認証機能まで設置できれば、確実に不正ログインされることはありません。
ただし2段階認証に不安がある人は、reCAPTCHAの設置まで頑張りましょう。
1)Wordfence Securityでブルーフォースアタック対策を実施する

サイトにセキュリティ対策が実施されておらずパスワードも短いと、簡単にログインされてしまいます。
Wordfence Securityでのブルーフォースアタック対策を解説します。

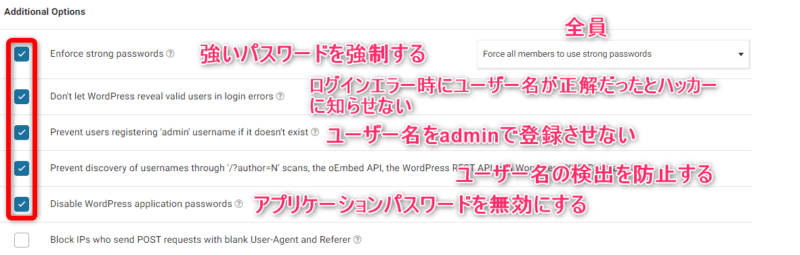
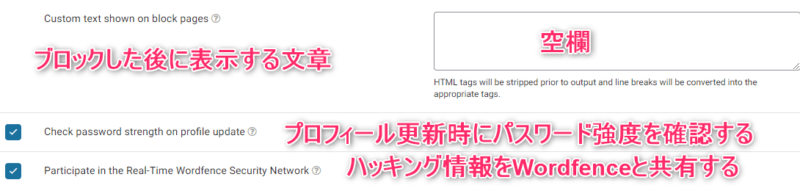
【Wordfence】⇒【All Options】の画面に進み、下にスクロールしていくと【Brute Force Protection】という項目があるのでクリックします。
Shota以下に日本語訳した項目と、私が推奨する設定を記載したので参考にしてください。

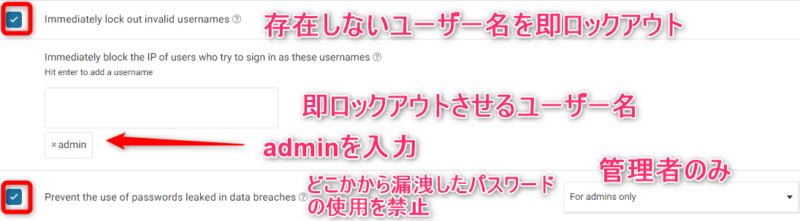
ユーザー名の検出を防止できているのか検証
項目の【ユーザー名の検出を防止する】が機能しているのか検証しました。
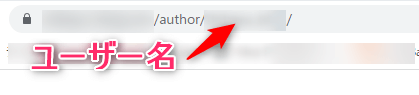
WordPressの初期設定ではURL入力欄に「(ドメイン名)/?author=1」と入力すると「(ドメイン名)/author/(ユーザー名)」と表示されてしまいます。
フェニックユーザー名がバレバレじゃないか!
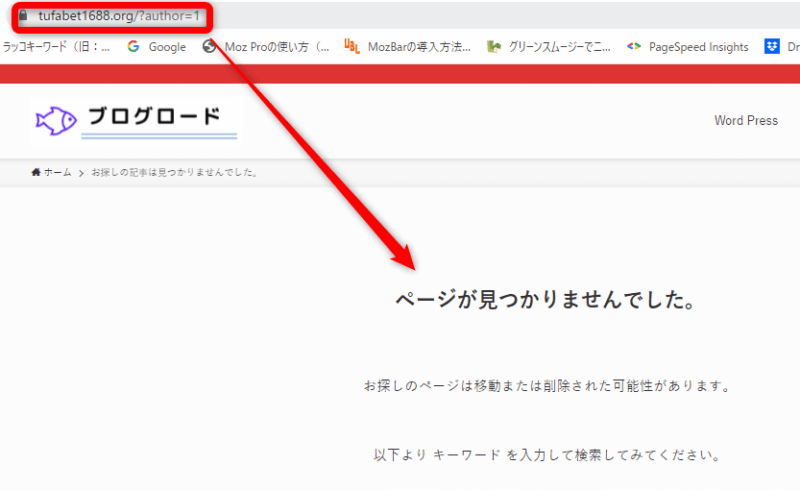 Shota
ShotaWordfence Securityのセキュリティ機能が働いていることを検証できました。
2)Wordfence SecurityでreCAPTCHAを設置する
reCAPTCHAには悪質なクローラーと人間を区別する機能があります。
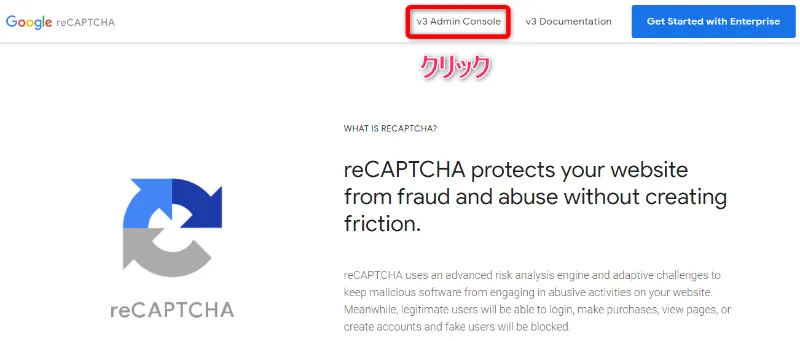
今回は最新版のreCAPTCHA V3をWordfence Securityと連携させて、ログイン画面に設置する方法を解説します。
以下のリンクに移動して案内に従い、reCAPTCHA V3の設定に必要なサイトキーとシークレットキーを入手します。
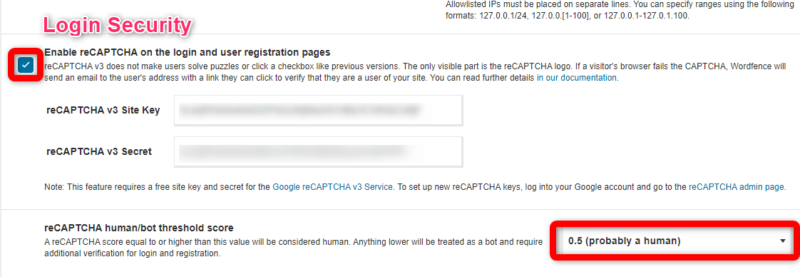
ダッシュボードに戻り【Wordfence】⇒【Login Security】⇒【Setting】とページを進めます。
上図の項目を表示できたら以下のように設定します。
- Enable reCAPTCHA on the login and user registration pages:チェックを入れる
- reCAPTCHA v3 Site Key:取得したサイトキーを入力
- reCAPTCHA v3 Secret:取得したシークレットキーを入力
- reCAPTCHA human/bot threshold score:0.5(probably a human)を選択
設定が完了したら、ページ上部にスクロールして【SAVE】をクリックします。
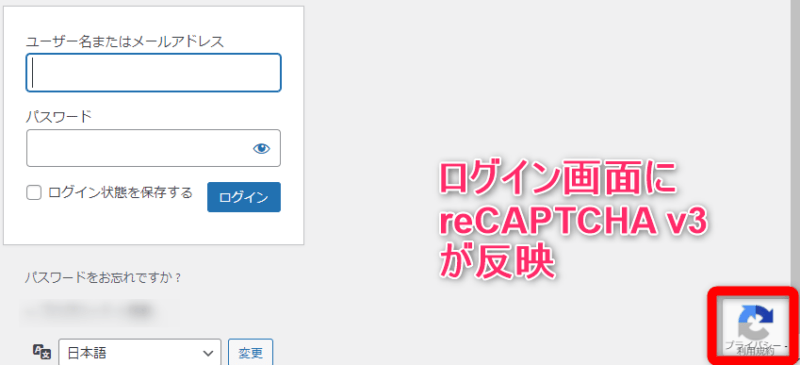
サイト管理ページからログアウトして、ログインページを表示させます。
上図のようにreCAPTCHAマークが反映されていたら、reCAPTCHA V3の設定は成功です。
3)Wordfence Securityで2段階認証機能を設置する
2段階認証機能とは、Wordpressにログインさせるために2回セキュリティコードを入力させる機能です。
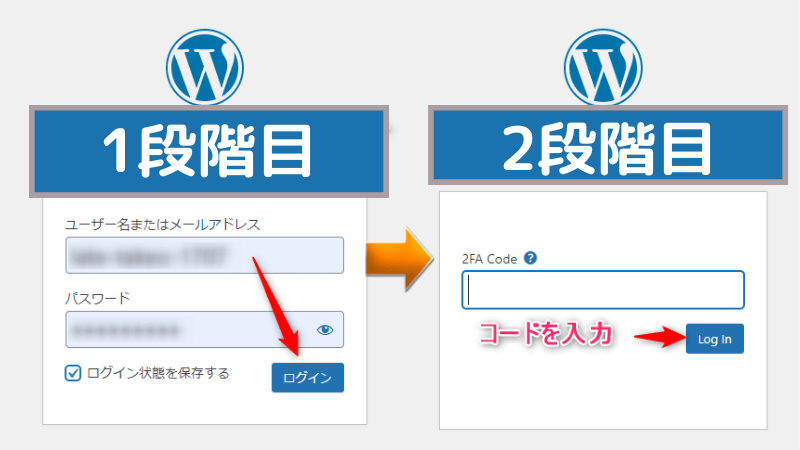
- 1段階目は通常通り、ログイン画面にユーザー名とパスワードを入力させます
- 1段階目の入力内容が認証されたら、2段階目として新たなログイン画面が表示され2FAコードを入力させます
- 2FAコードが認証されたら、ようやくWordPressにログインできるようになります
これが2段階認証機能です。
2FAコードはあなたの携帯電話に表示され、30秒ごとに変更されます。
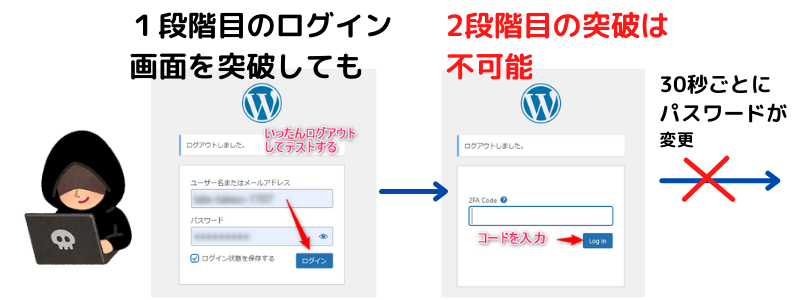
2段階機能を設置すると、ハッカーは完全にWordPressに不正ログインできなくなります。
1段階目の認証機能を突破できても、2段階目の認証機能を30秒で突破するのは不可能だからです。
Shota2段階認証機能こそWordfence Securityプラグインの目玉機能だといっても過言ではありません!
Wordfence Securityを使い、2段階認証機能を設置する方法
【Wordfence】⇒【Login Security】⇒【Two-Factor Authentication】へとページを進めます。
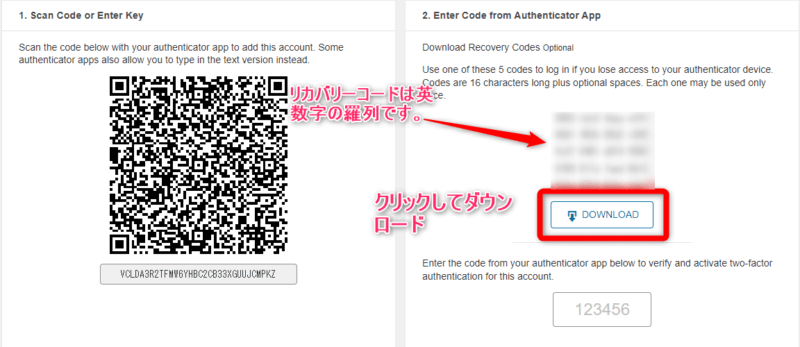
上図の画面が表示されたら【Enter Code from Authenticator App】の項目にある【DOWNLOAD】をクリックします。
リカバリーコードがダウンロードされるので、パソコン上で大切に保管してください。
携帯を紛失してログインできなくなった時に使用します。
ShotaリカバリーコードでWordPressにログインする方法はこの後解説します。ご安心ください。
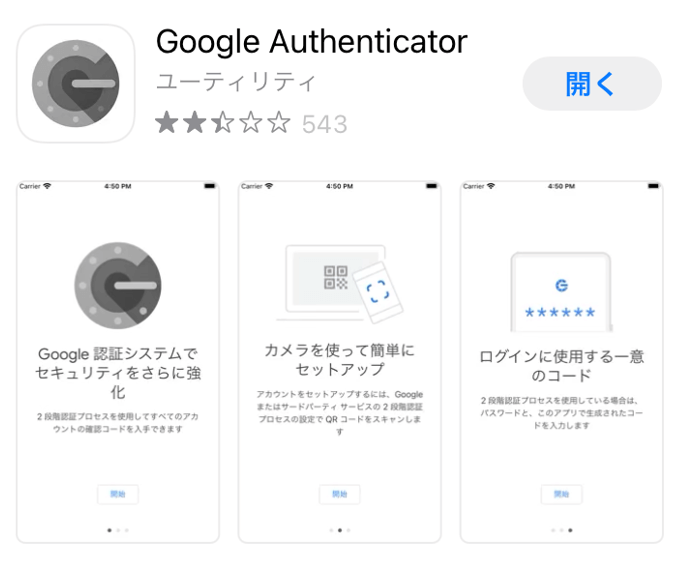
携帯電話にGoogle Authenticatorアプリをダウンロードします。
ShotaGoogleストアとAppleストアの両方からダウンロードできます。
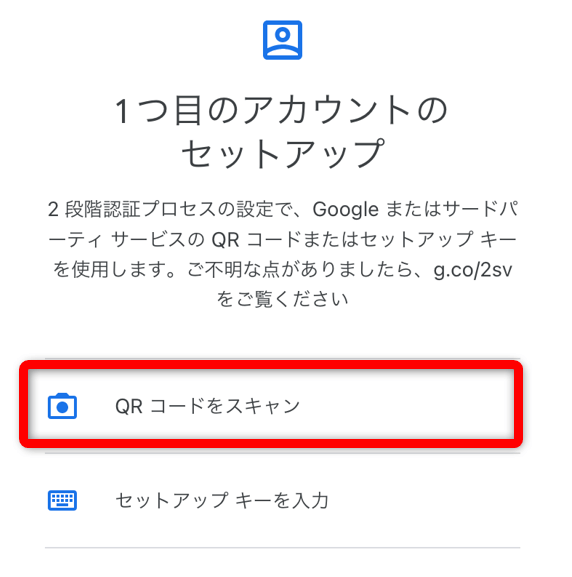
Google Authenticatorの【開始】をクリックし、画面が切り替わったら【QRコードをスキャン】を選択します。
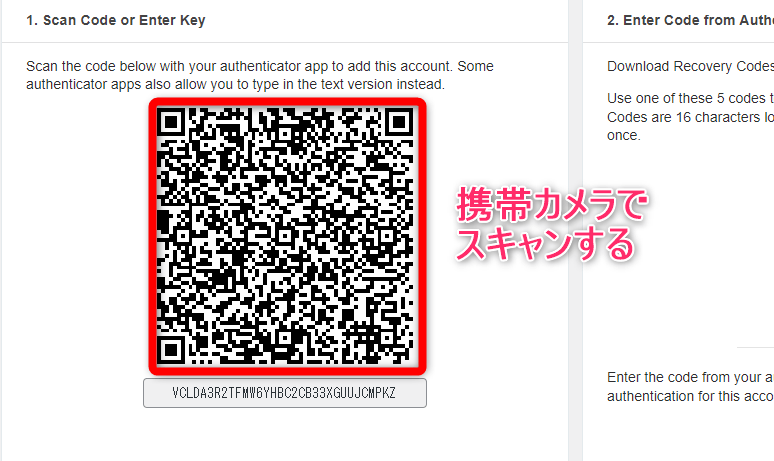
Google Authenticatorがカメラモードに切り替わるので、上図のようにコードをスキャンします。
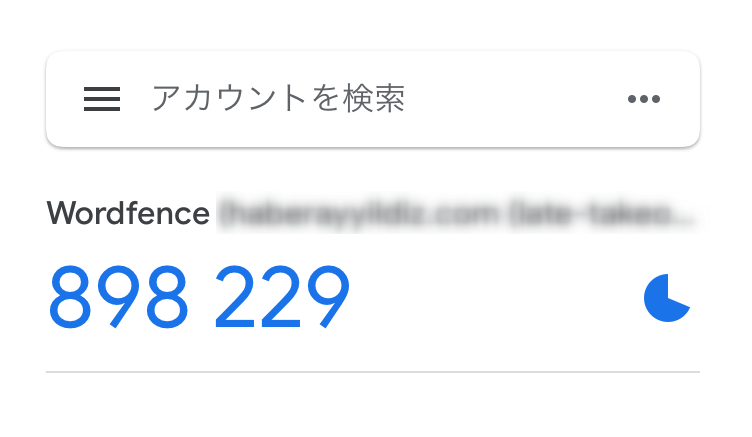
Google Authenticatorに2FAコードが表示されます。
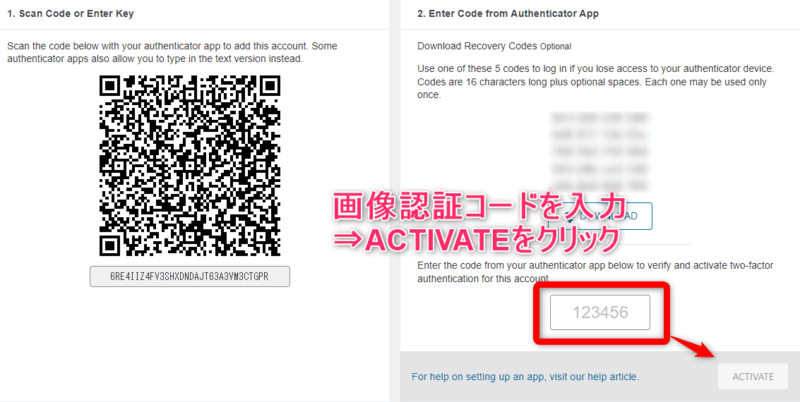
【Enter Code from Authenticator App】の空欄に2FAコードを入力し、【ACTIVE】をクリックすれば2段階認証機能の設置は完了です。
2段階認証機能が稼働するか確認する方法
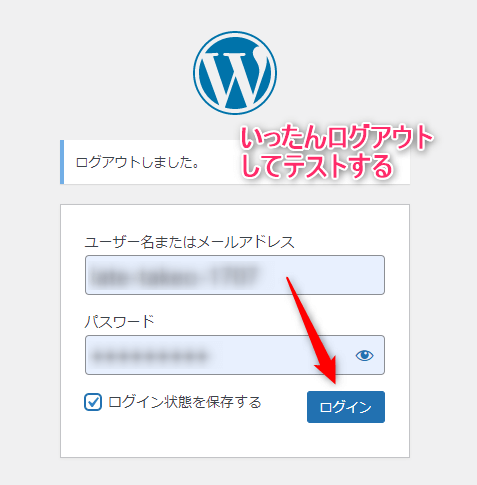
WordPressのダッシュボードからいったんログアウトし、ユーザー名とパスワードを入力しログインします。
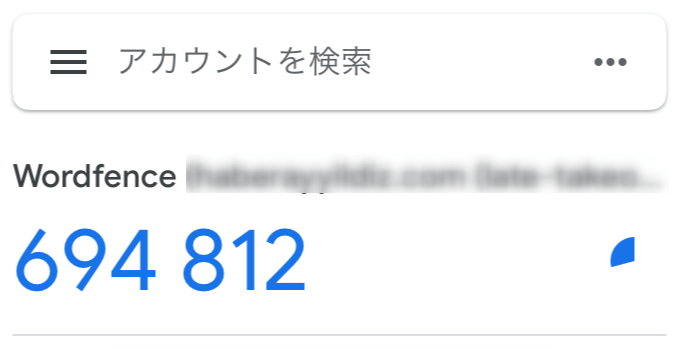
携帯電話のGoogle Authenticatorに表示された2FAコードを確認します。
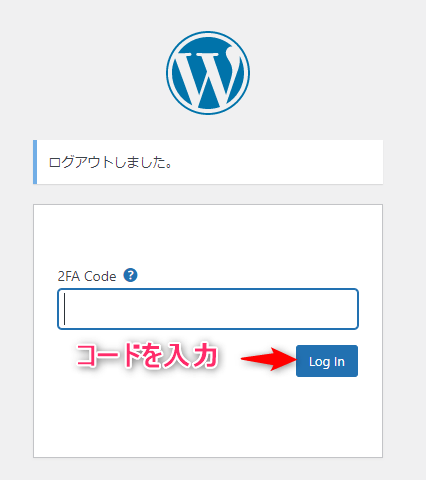
2段階認証画面に2FAコードを入力し、WordPressにログインできるか確認してください。
2FAコードはGoogle Authenticatorにずっと表示され続けます。
30秒ごとにコードが変化し続けるので、2段階機能は安心して利用できます。
2段階認証できずWordPressにログインできない場合の対処方法
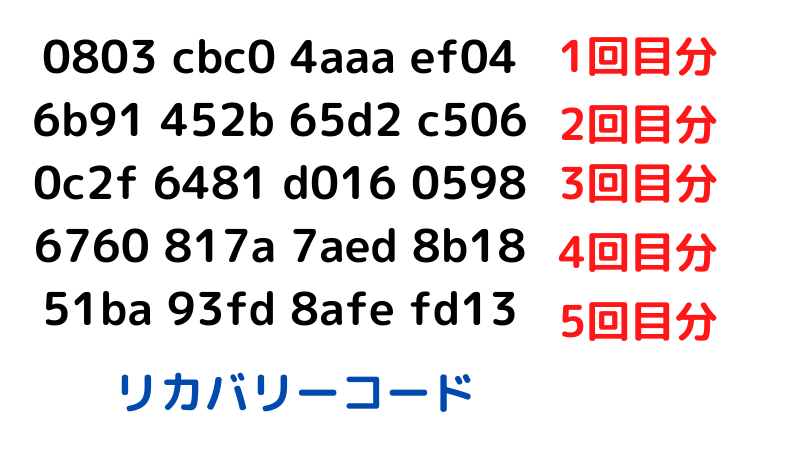
リカバリーコードは12桁の英数字で、全部で5回使用できます。
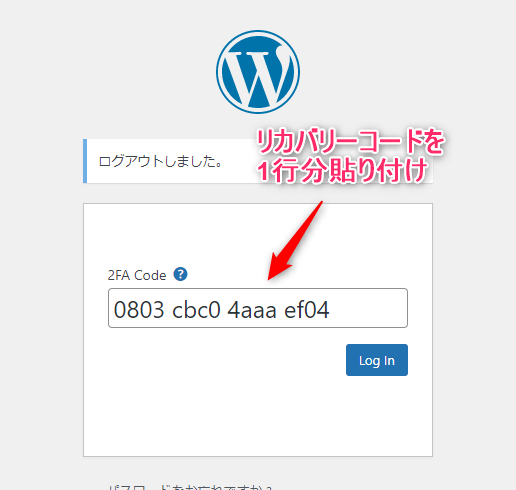
ダウンロードしたリカバリーコードを1行分貼り付ければ、ログインできます。
フェニック5回も携帯電話をなくすことは無いので安心だよ。リカバリーコードはパソコンの中に大事に保管しておくね。
Wordfence Securityでスパムコメントをブロックする
ブログにコメント欄を設置すると、PV数の増加と共にスパムコメントが書き込まれるようになります。
Wordfence Securityを使い、スパムコメントをブロックする方法を解説します。
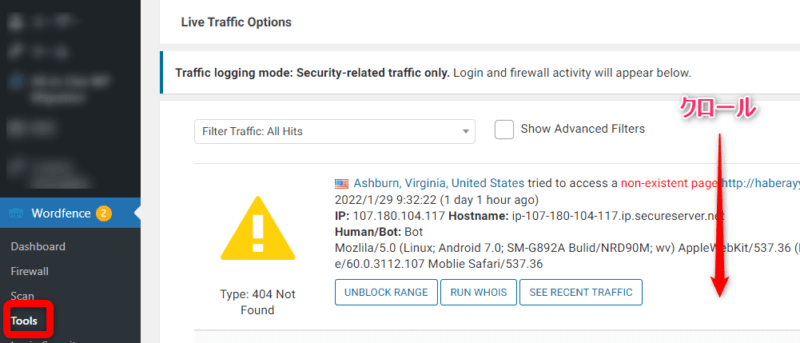
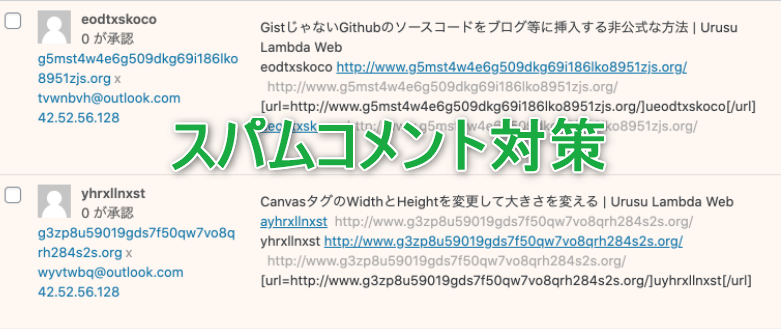
【Wordfence】⇒【Tools】⇒【Live Traffic】へとページを進めます。
画面を下にスクロールしていくと、ログインしようとしたユーザーとクローラーが一覧で表示されます。

【RUN WHOIS】をクリックし、管理者情報を確認します。
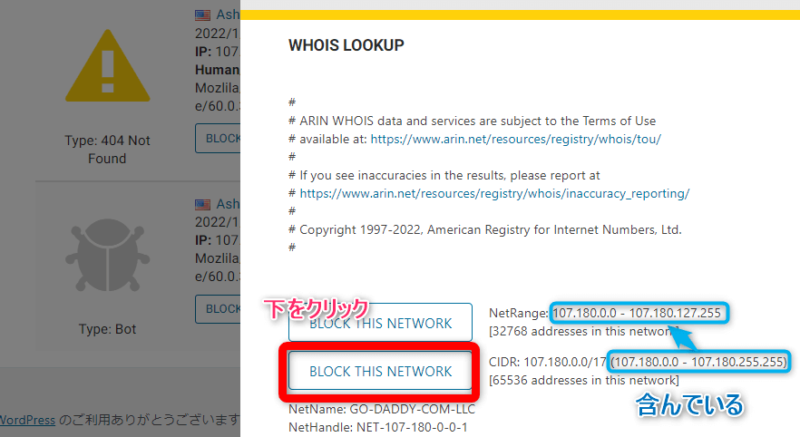
スパムボットの管理者情報が表示されたら、画面一番下の【BLOCK THIS NETWORK】をクリックし、スパムボットを配信するネットワークを遮断します。
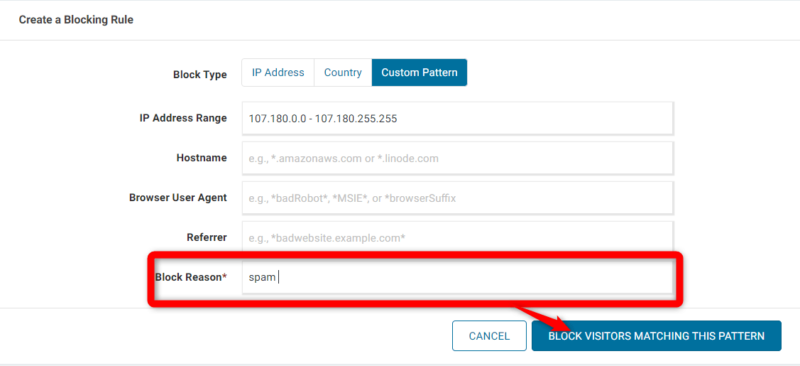
【BLOCK THIS NETWORK】をクリックすると、上図の画面が表示されます。
ブロックした理由の記載が必要なるので【Block Reason】に「spam」と書き込み【BLOCK VISITOR MATCHING THIS PATTERN】をクリックすれば、スパムボットのブロックは完了です。
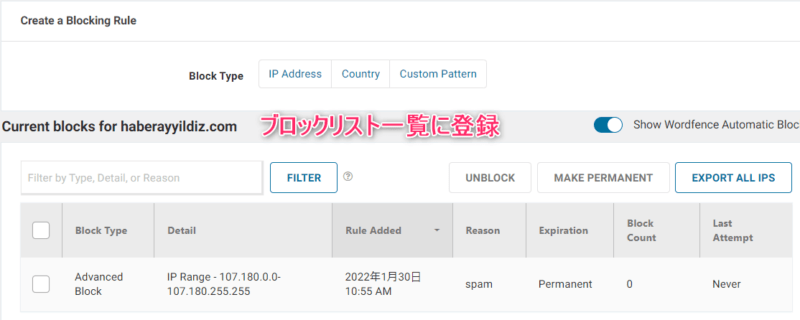
ブロックしたネットワーク情報の一覧は【Wordfence】⇒【Firewall】⇒【Blocking】のページで確認できます。
フェニックこれがいわゆるブラックリストですね。スパムメールボットをブロックする作業は意外に楽しいぞ!
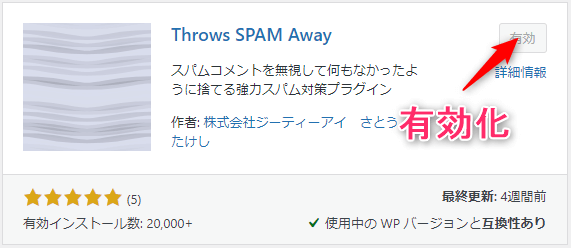
私はThrows SPAM Awayを推しています。
| プラグイン | 無料使用 | 相性が悪いテーマ | スパムコメントの除去方法 |
|---|---|---|---|
| Throws SPAM Away | 可能 | なし | 自動 |
| Akismet Anti-Spam | 不可能 | なし | 手動 |
| Invisible reCaptcha for WordPress | 可能 | あり(Swell) | 自動 |
表の通りThrows SPAM Awayは他のスパムコメント対策プラグインより優秀です。
詳しくはThrows SPAM Awayの設定方法【Akismetの代替プラグイン】で解説しています。
Wordfence Securityのスキャン機能でサイト内を点検する
Wordfence Securityのスキャン機能を使うことで、WordPress内に悪質なファイルやURLが埋め込まれていないか点検することができます。
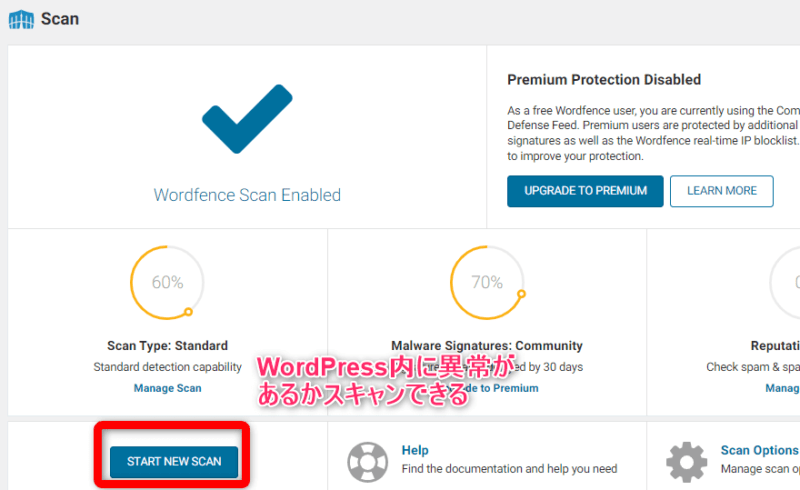
【Wordfence Security】⇒【Scan】へとページを進めます。
上図の画面が表示されたら【START NEW SCAN】をクリックします。
スキャンが始まると、Wordfence Securityはサイト内の全てのファイルをスキャンします。
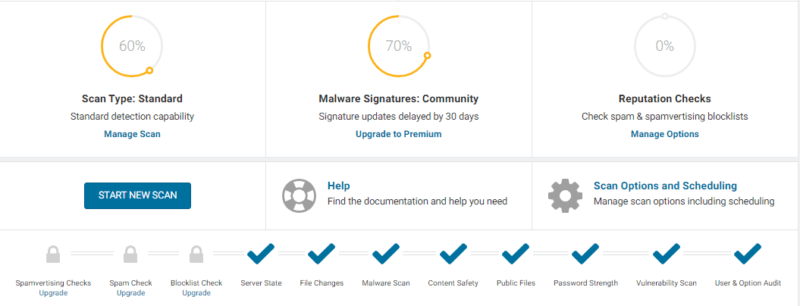
Wordfence Securityが危険なファイルを特定してくれます。
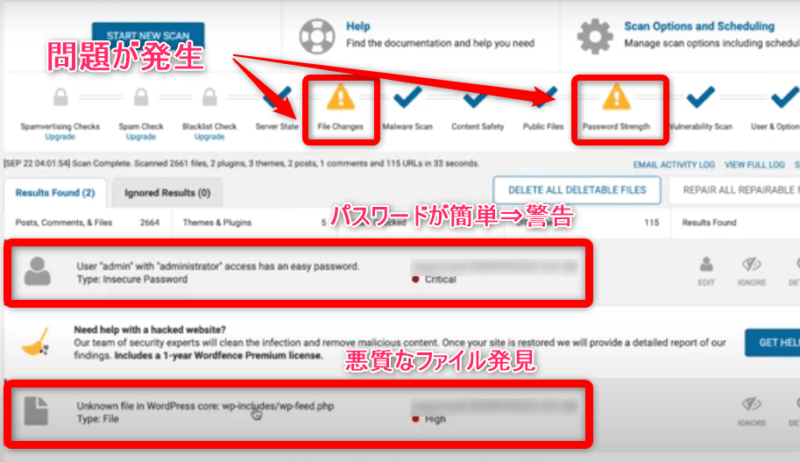
上図では問題を2点特定してくれました。
- ログインパスワードがadminとなっており、パスワードのセキュリティ強度が弱い
- 悪質なファイルがサイトに埋め込まれている
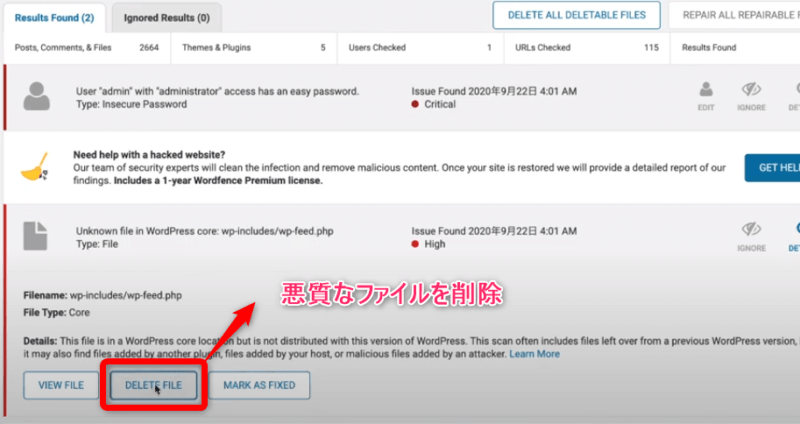
悪質なファイルがあった場合は【DELETE FILE】をクリックすると削除できます。
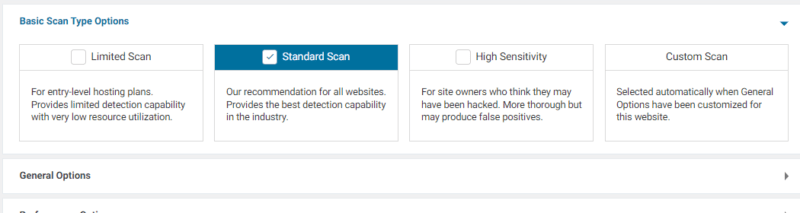
【Wordfence Security】⇒【All Options】⇒【Basic Scan Type Options】へとページを進めます。
デフォルトで設定されている「Standard Scan」でOKです。
ただし明らかにサイトに異常を感じたときは「High Sensitivity」を選択し、スキャンの精度を上げてサイト内を診断しましょう。
Wordfence Securityはサイトを自動でスキャンしてくれる
実は【START NEW SCAN】を押さなくても、自動で定期的にサイト内をスキャンしてくれます。
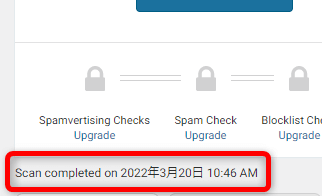
スキャンの実施日時は、スキャン結果のすぐ下に表示されています。
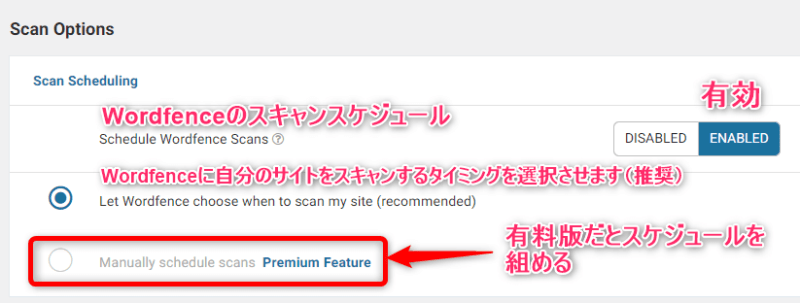
ただし無料プランだとスキャンのスケジュールは、Wordfence Securityに委ねることになります。
有料プランにすると自分でスキャンのスケジュールを組めますが、個人ブロガーなら必要はないです。
Shota肌感覚ですが、Standard Scanなら24時間に1回自動でスキャンしてくれます。
締めに入る前にお知らせです。
SWELLユーザーの方にはSWELLプラグインの記事もおすすめです。
Wordfence Securityを導入した後は
ブログツールを導入すると、より確実に稼げます。
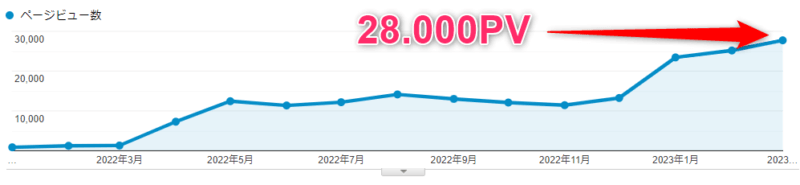
以下の記事では、開設14ヶ月で「月間28,000PV、月間収益5万円」を実現させた神ツールを紹介しています。
ぜひチェックしてみてください。
>>ブログアフィリエイト収益化を加速させるおすすめツール20選
まとめ

今回はWordfence Securityの設定方法と使い方を解説しました。
- ブルーフォースアタック対策、reCAPTCHA、2段階認証で不正ログインを防止できる
- スパムコメントをブロックできる
- スキャン機能でサイト内を点検できる
Wordfence Securityの使い方をマスターし、ブログを安全に運営しましょう。
Wordfence Securityの質問集

この項目ではWordfence Securityを使用するにあたり、よくある質問について解説します。
Wordfence Security を導入したらサイトが重くなる?
サイトが重くなった場合の対処方法を2つ紹介します。
自動スキャン機能を無効にする
サイトが重い場合は自動スキャン機能を無効化するだけで、軽くできます。
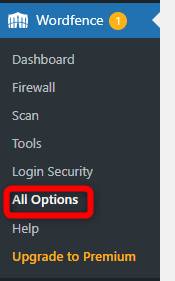
ダッシュボードから【Wordfence】⇒【All Options】とページを進めます。
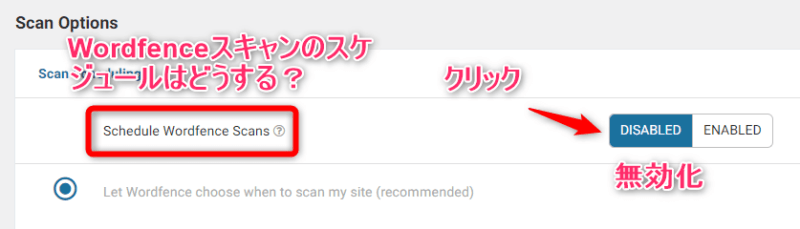
ページを下にスクロールし【Scan Scheduling】の項目を確認します。
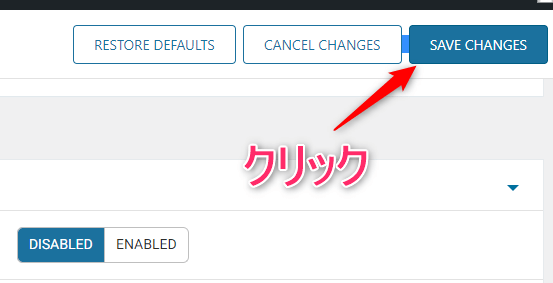
【SAVE CHANGES】をクリックすれば作業完了です。
なお自動スキャン機能はなくなります。
定期的に手動でスキャンして、サイト内の安全性をチェックしましょう。
不要なセキュリティプラグインを削除する
以下のセキュリティプラグインとは機能が被るため、削除すればサイトが軽くなります。
- SiteGuard WP Plugin
- Invisible reCaptcha for WordPress
- All In One WP Security
サイトが重いと感じた場合は、この機会にプラグインを断捨離しましょう。
Wordfence Securityを削除したのにサイトが重いのはなぜ?
フェニックWordfence Securityを削除したのにサイトが重いんだけど。
ShotaWordfence Securityを削除する時に気を付ける点があります。
これではせっかくプラグインを削除してもブログ動作が軽くなりません。
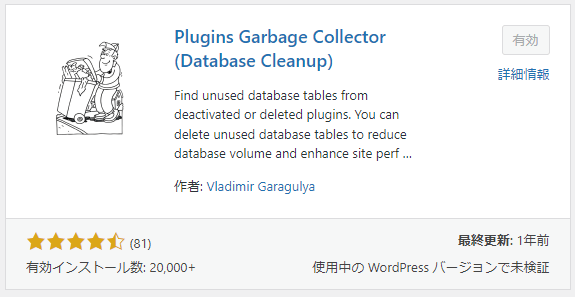
Wordfence Securityを削除した後、プラグイン「Plugins Garbage Collector」を使い、どれぐらいテーブルデータが残されているのか確認しました。
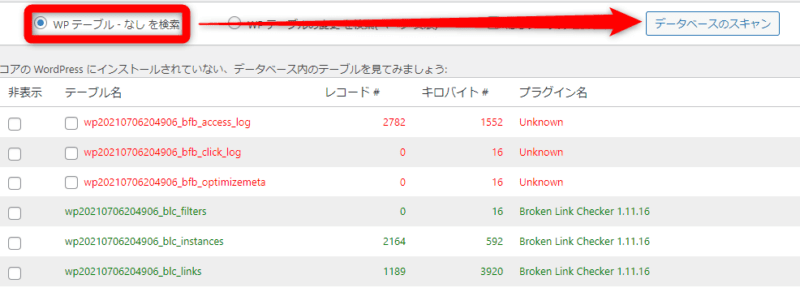
有効化した後、【データベースのスキャン】をクリックするだけです。
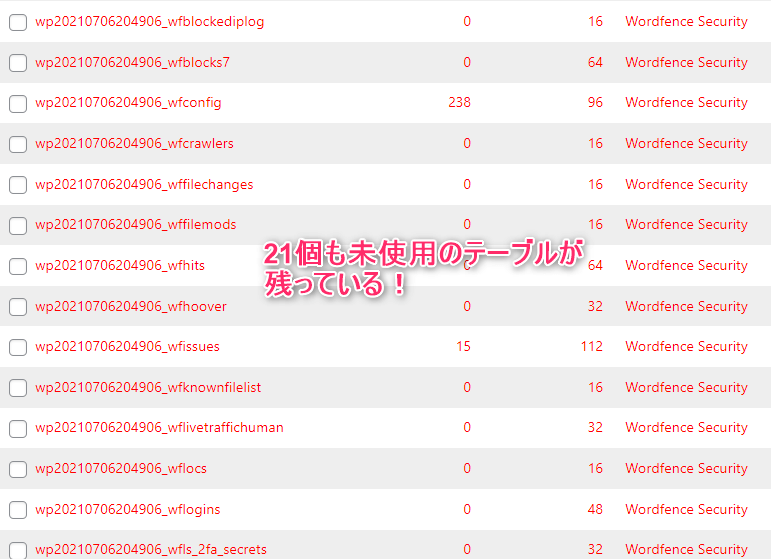
なんとWordfence Securityのテーブルデータが21個も残されていました。
残されたWordfence Securityのテーブルデータを削除する方法
方法は2つあります。
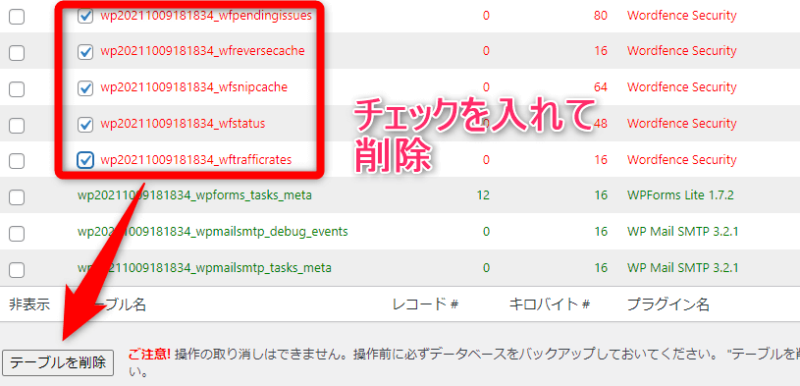
- Plugins Garbage Collectorの表示画面で、Wordfence Securityのテーブルデータにチェックを入れて【テーブルを削除】をクリックする
- その後にWordfence Securityを削除する
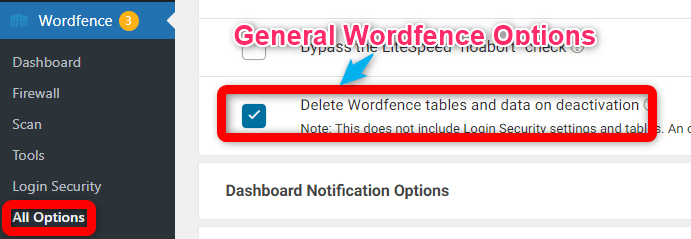
- WordPressのダッシュボードから【Wordfence】⇒【All Option】⇒【General Wordfence Options】へとページを進める
- 【Delete Wordfence tables and data on deactivation】をクリックしセーブする
- その後にWordfence Securityを削除する
これでWordfence Securityのデータを残さずに、プラグインを削除できます。
Wordfence Securityの有料プランは必要?
Wordfence Securityの2段階認証機能を利用すれば、ほぼ100%ハッキングされることはないからです。
万が一1段階目のログイン画面を突破されても、2段階目のログインパスワードは30秒ごとに変化します。
これではどんなハッカーが挑んでも突破は不可能です。
個人ブロガーなら、無料プランで十分です。
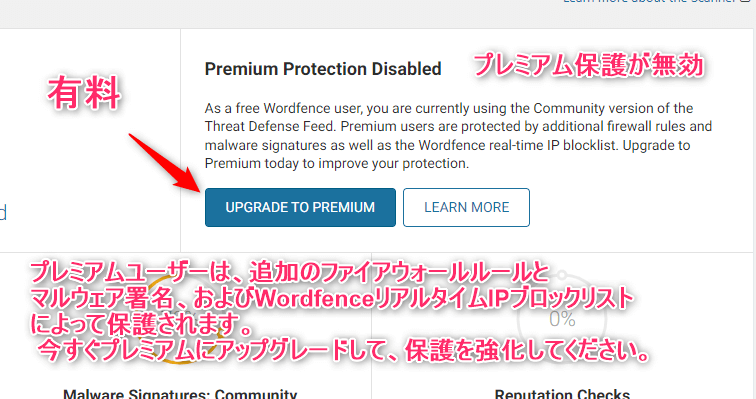
ちなみにWordfence Securityを有料プランにすると、得られる機能は以下の通りです。
| 追加機能 | 機能の解説 |
|---|---|
| リアルタイムIPブロックリストの適応 | Wordfence Securityが保有している最新のハッカー情報をもとに、事前にIPブロックしてくれる |
| スキャン機能の拡張 |
|
| 国ごとアクセスをブロック | ログイン画面でのハッキング機能を解析し、国レベルでの関与が疑われる場合は国ごとIPアドレスをブロックする |
Wordfence Securityの有料プランの申し込み方法
フェニックどうしても有料プランに申し込んでガチガチにセキュリティを固めたいぞ!
Shotaそういう方のために有料プランの申し込み方法を解説します。
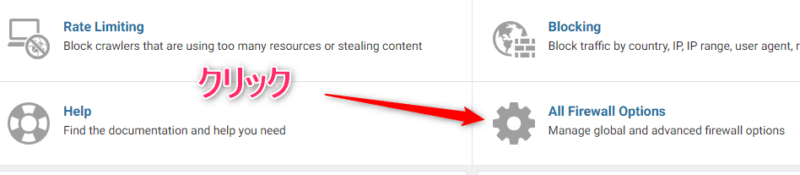
「リアルタイムIPブロックリストの適応」はダッシュボードの【Wordfence】⇒【Firewall】⇒【All Firewall Options】から申し込みます。

内容を確認し問題がなければ【UPGRADE TO PREMIUM】をクリックしましょう。
「スキャン機能の拡張」はダッシュボードの【Wordfence】⇒【Scan】から申し込みます。
内容を確認し問題がなければ【UPGRADE TO PREMIUM】をクリックしましょう。
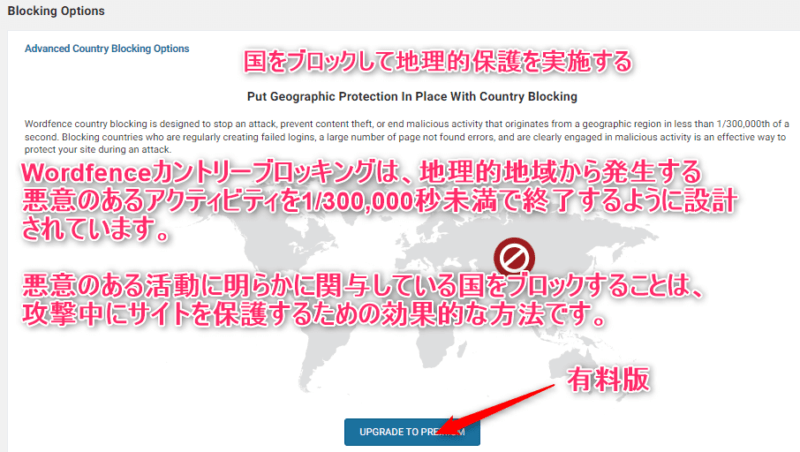
「国ごとアクセスをブロック」はダッシュボードの【Wordfence】⇒【All Options】から申し込みます。
内容を確認し問題がなければ【UPGRADE TO PREMIUM】をクリックして申し込みましょう。